

Selecting & Planting Perennials
Choosing Perennials:
When selecting perennials for planting, look for fresh, healthy-looking plants that appear vigorous and ready to grow. Avoid overgrown, root-bound plants and any that have insects or diseases.
Holding:
Although perennials can be held in their containers for a short period of time, we recommend they be planted as soon as possible to avoid them drying out in the pots. The sooner you plant them, the faster they can become established in your garden!
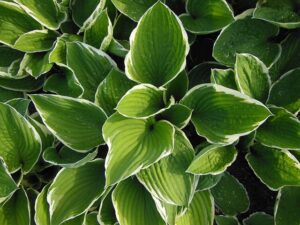
PublicDomainPictures / Pixabay
When to Plant:
Spring is the ideal time to plant container-grown perennials. They have a chance to get well established before the heat of summer arrives. Spring is also a good time to divide or transplant most types of perennials that you may already have in your garden. Peonies,
Iris and Oriental Poppies should not be divided in the spring, but can be planted from containers all season long.
Summer planting is very successful, as long as plants are not allowed to dry out. Watering is especially important if the weather is hot and dry. Transplanting or dividing perennials already established in your garden is not recommended during the summer, except for Bearded Iris, which should be divided only in July or August.
Fall planting is highly recommended in most areas. Early-blooming varieties will put on a colorful display in spring if planted in the fall. Dividing or moving established perennials in the fall is usually very successful. Winter frosts may “heave” fall-planted perennials. Check them in late winter, and if any have popped out of the ground, gently press them back in place.
Planting your Garden:
Design your project on paper first, or by setting out the pots and rearranging them until you are happy with the concept. Please keep in mind, those little plants are going to grow, and some varieties may eventually take up more room than you first think.
Preparing your Site:
Soil: Most perennials grow best in a deep, rich, well-drained soil. Check the plant tag for specific soil or site requirements. Properly preparing your soil is the single most important step to having healthy, successful gardens.
Dry, sandy soils can be improved by adding plenty of organic matter, such as compost, moistened peat moss, or composted manure. Dig the area to a depth of at least 8 inches, preferably with a fork or spade.
Heavy clay soils need to be opened by adding plenty of organic matter, along with perlite or coarse sand. Gypsum will also loosen the soil, but will take 1-2 years to make a noticeable difference.
Few perennials do well in wet, poorly drained soils. Consider building raised beds or installing drainage tubing if you have a soggy garden area.
Weeds: The planting area must be free of perennial weeds, especially spreading types like Canada Thistle, and Couch or Quack Grass. Annual weeds are easily controlled by hand weeding.
Mulching around your plants will help to control weeds, and will keep roots cool and moist. Choose a mulching material that is organic and weed free, such as bark, cocoa beans, or shredded leaves.
How to Plant:
Hold pot upside-down and shake or tap to loosen the plant. If lots of roots are visible, the plant may be root-bound. If so, the root ball must be disturbed to force new, healthy root growth. Using a sharp knife, slice off the bottom inch of roots and rough up the sides of the ball with your fingers.
With a spade or trowel, open up a hole deep enough to accommodate the root ball. For best planting results, use the “puddling method”. Fill the hole with water, place the plant upright in the hole and fill in around the roots with soil. Pat the soil to thoroughly mix the soil and water. This helps to eliminate any air pockets around the roots and ensures sufficient moisture for growth. Be sure the root ball surface is at or just slightly below the garden soil surface. After planting, spread a mulch to a depth of 1-2 inches.
Watering:
Water plants immediately after planting and once a week or so for the first two weeks, unless the weather is rainy. Summer plantings may require more frequent watering, especially during periods of drought.
Fertilizing:
Perennials may be fertilized with either a liquid or a slow-release granular-type fertilizer, we recommend Osmocote® be put in the hole when you plant. If your soil is fertile and well-prepared to begin with, no additional fertilizing should be necessary the first year, although incorporating some bone meal at planting is often helpful. Established perennial beds benefit from a yearly spring application of slow-release fertilizer or compost.
Maintaining you Perennials:
A good reference book on perennials will help you to learn about any special things that should be done to your plants, such as staking, cutting back and controlling any diseases or pests. Consider The Sunset Western Garden Book; Random House’s Perennials Volume 1, Early Perennials, or Perennials Volume 2, Late Perennials.
Here are some general guidelines for maintaining perennials:
- Prune off any dead tops in late winter or early spring.
- Remove dead flowers to encourage repeat blooming.
- Water during drought if possible; early morning is best.
- Clip back scruffy looking plants to promote fresh, attractive growth.
- Control pests and diseases as soon as noticed to avoid spreading the problem to other plants.
- Stake Peony, Delphinium, ‘Summer Phlox’ and other tall plants early to avoid wind damage later.
- Divide perennials when the center of the plant begins to die out with age.
Some of the information on this page provided by Heritage Perennials


